Windows Development Setup Guide
Written on
Just as there is a guide for macOS here, this post will go over setting up the development environment on Microsoft Windows, specifically Windows 11.
Along with information from googling around, I also want to give kudos to Alex Ziskind’s video on the subject matter.
It’s a good reference that I used the last time I did this, so consider this post basically the textual (along with screenshots) version of that video to some extent, but focusing primarily on the bare essentials.
Additionally, it’s highly recommended to uninstall bloatware programs from the manufacturer (in my case, HP), as well as Microsoft. This step is completely optional, and it will not be covered in this blog post.
Without further ado, let’s get started! 😎
Windows Subsystem for Linux 2 (WSL 2)
Assuming a fresh install of Windows 11, the first step is to install Windows Subsystem for Linux 2, or WSL 2. This will enable you to run an Ubuntu Linux environment inside Windows, eliminating the need for a heavy and slow virtual machine or dual-booting.
Open up Terminal as Administrator (Press Win + X, and select Terminal (Admin) from the menu):
Enter the following command below and reboot when prompted to do so.
wsl --install
However, I ran into the error below when I tried entering the command above, despite a freshly reinstalled copy of Windows 11 (via factory reset).
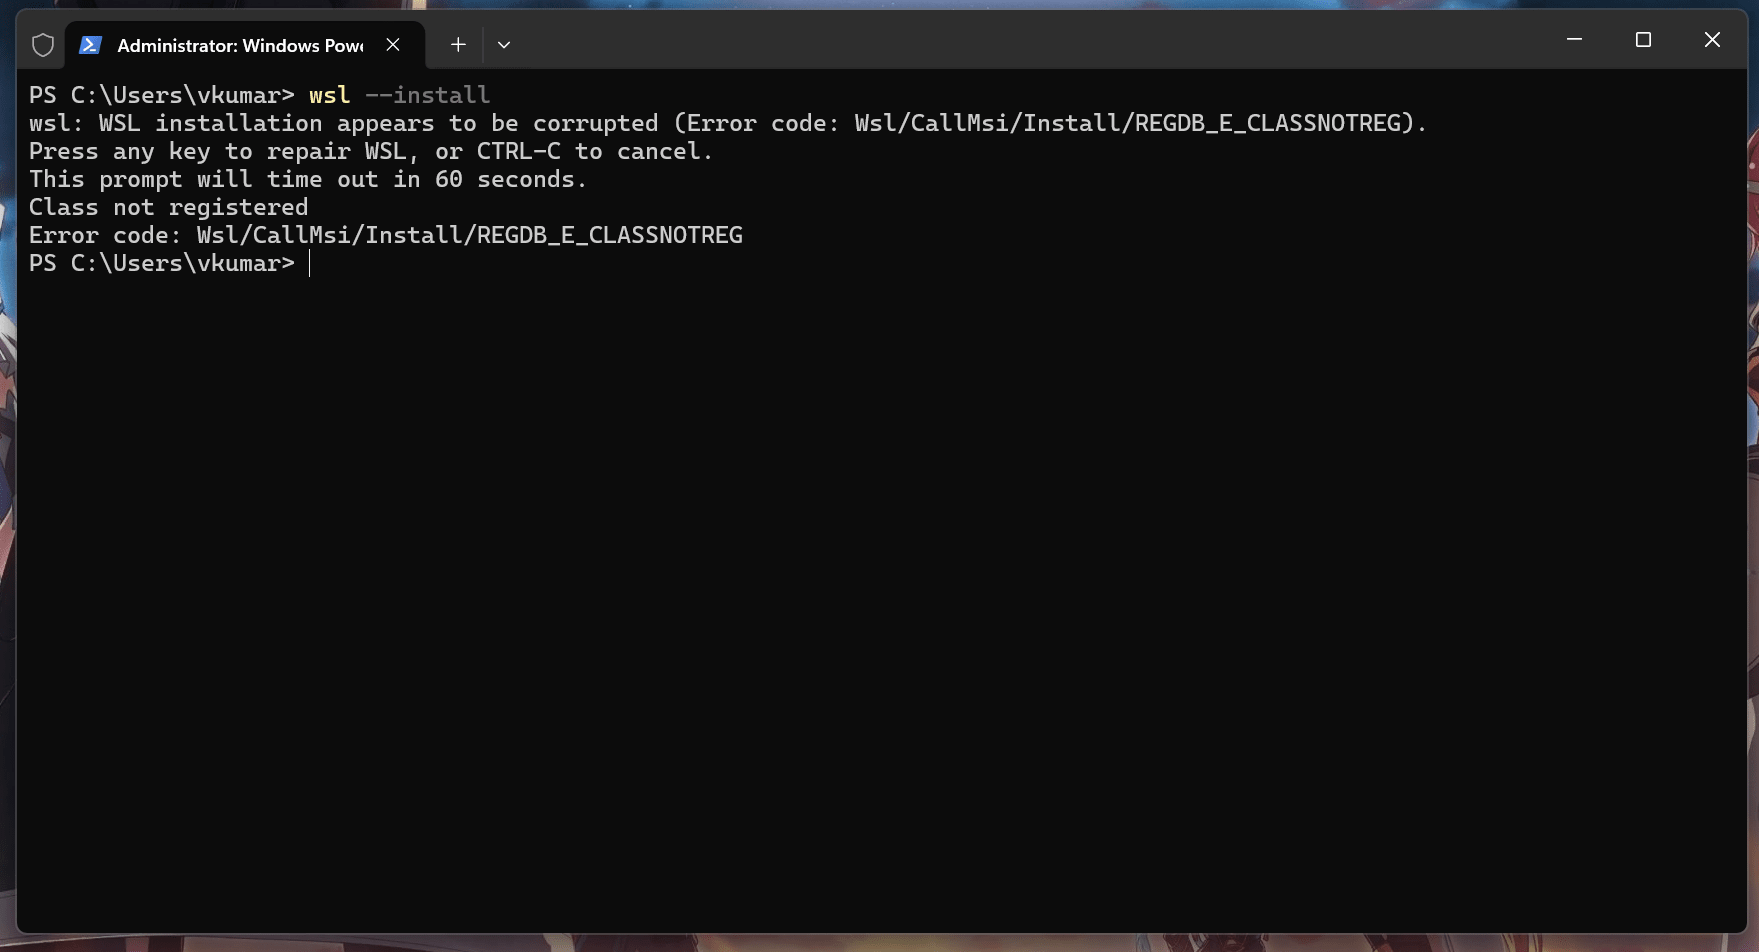
In the event this happens to you, the solution that worked for me was letting it repair itself. It had downloaded the latest version, WSL 2.7.14.0, and that resolved it.
Afterwards, run the wsl --install command again to install Ubuntu. It will prompt you for the username and password for the Linux environment.
It is also highly recommended to pin the WSL application icon, either in the Start menu or taskbar, so you can access the terminal.
With the installation out of the way, let us move on to the essential packages you will need for Linux. We will use sudo apt to install them in WSL. Run each command below individually:
sudo apt update && sudo apt upgrade -y
sudo apt install -y build-essential curl wget git unzip
This is essentially similar to running xcode-select --install on macOS. This will install the core packages such as the GCC C/C++ compiler, make, git, curl, etc. on your WSL instance.
Next, create a folder in your home directory using mkdir ~/code, and this is where you will store your projects, code, etc. Do not put it in the Windows filesystem within /mnt/c/ because it will lead to bad I/O performance.
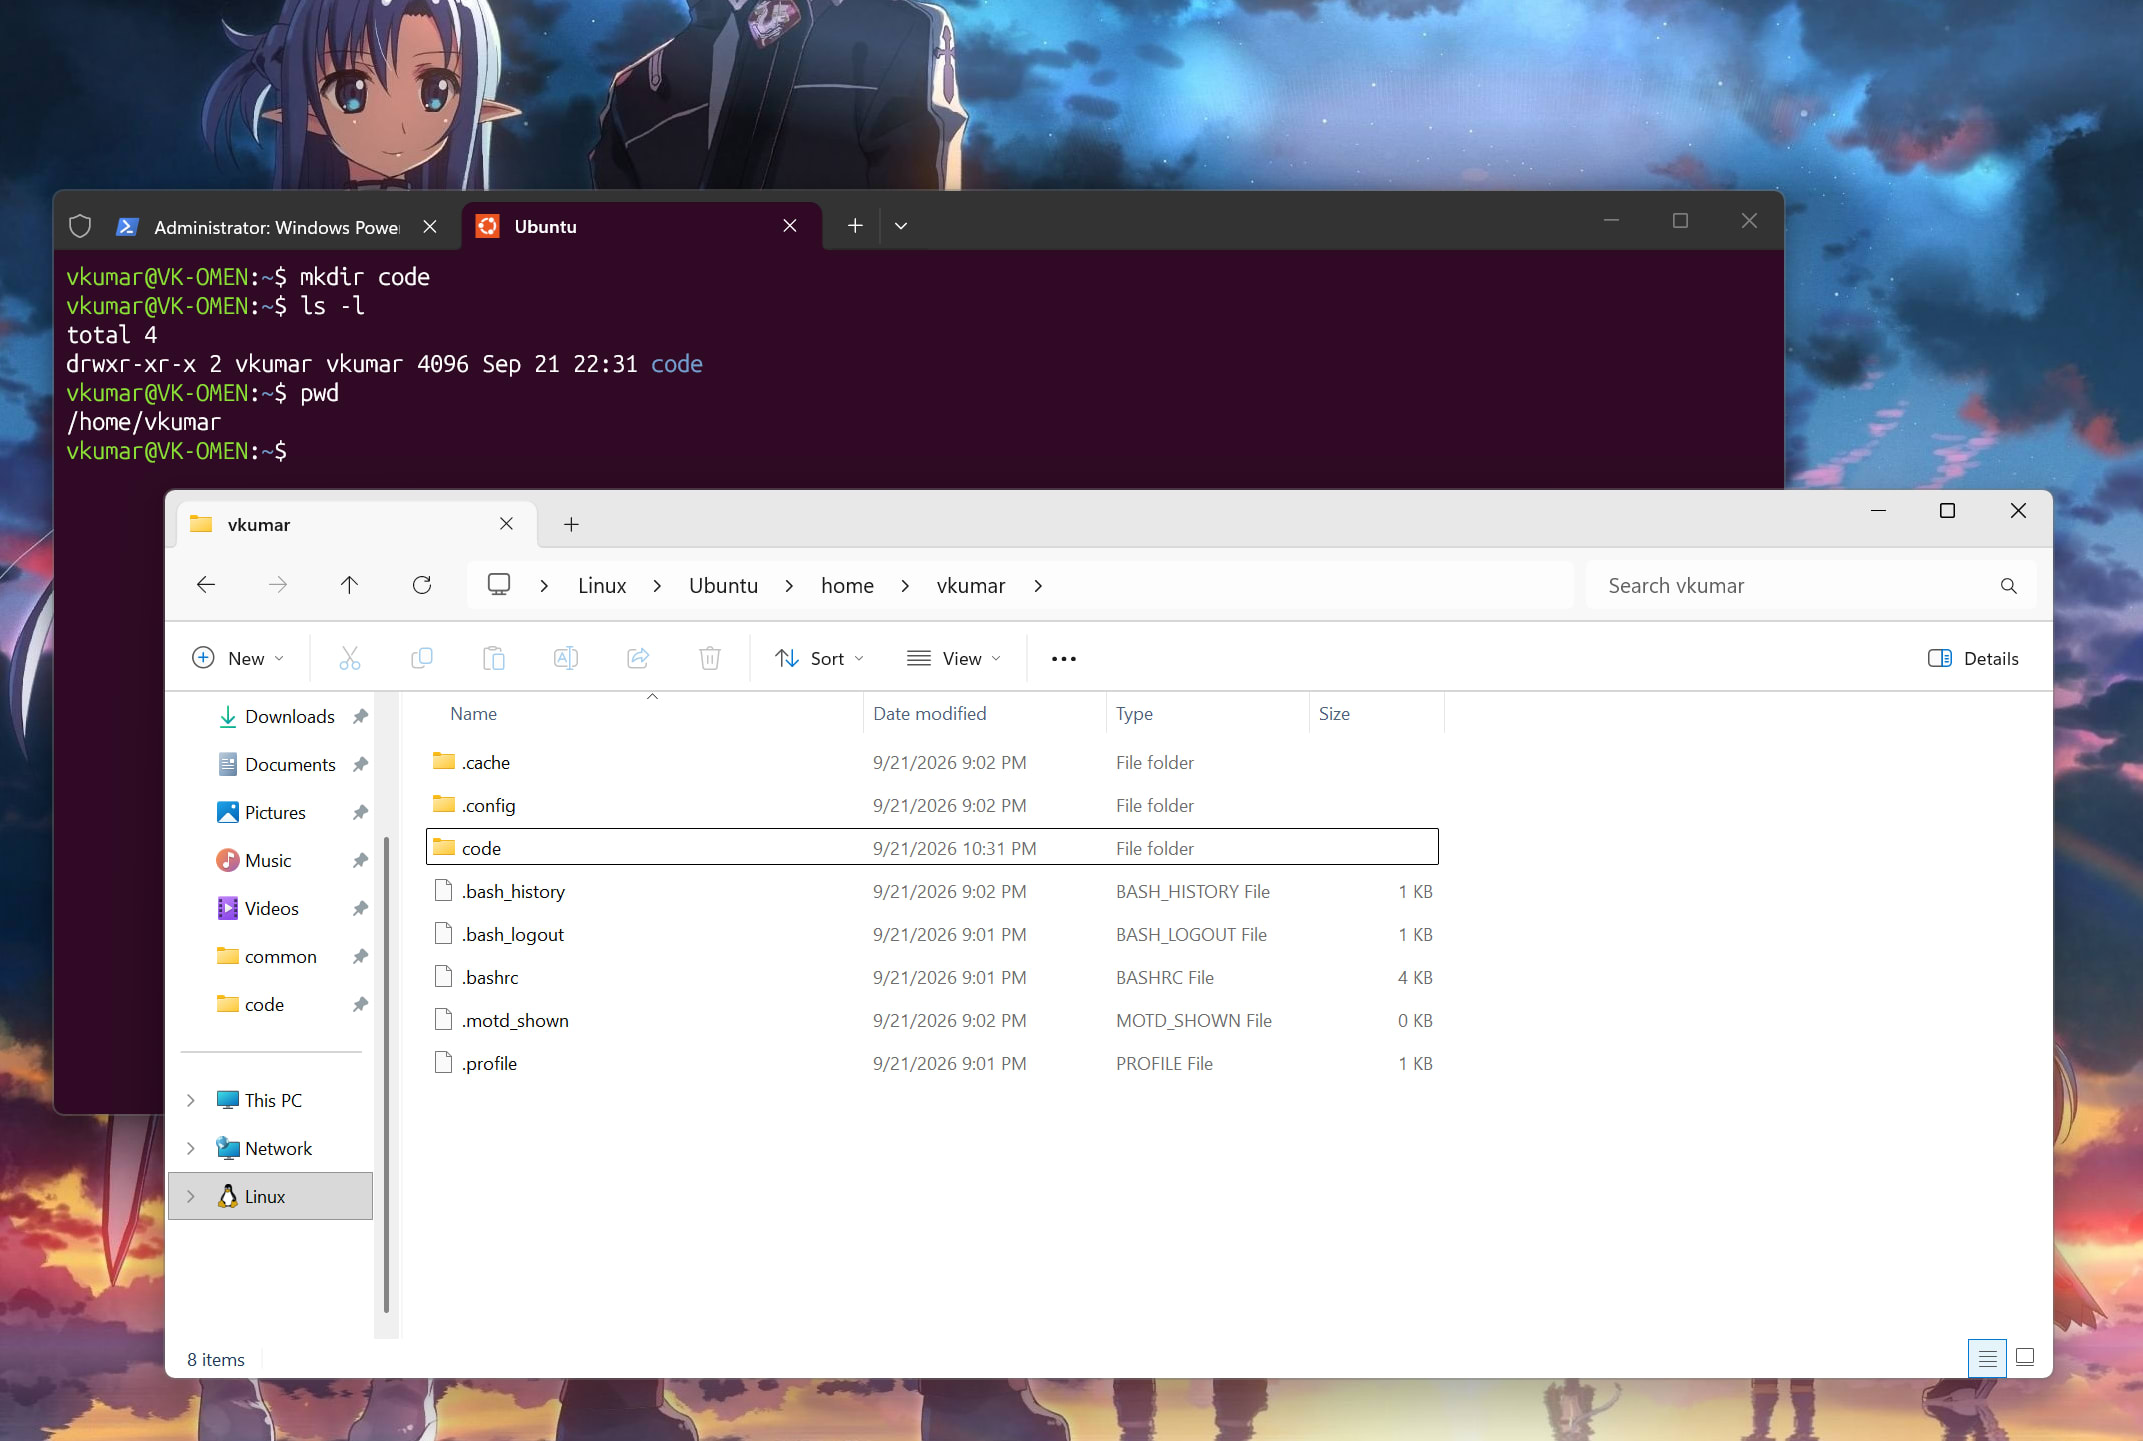
For ease of access, go to File Explorer, and on the left sidebar, you should see the Linux folder with a Tux icon.
Click on it, Ubuntu, then home, and finally the user folder. Inside there, right-click the code folder, and select Pin to Quick Access.
Setting Up Mise And UV Inside WSL
Just as was done for macOS, we will be using mise and uv to set up our language environment for node, java, and python.
Enter the following in the terminal (and unlike macOS, this uses bash, not zsh) to install the development tool manager on your system.
curl https://mise.run | sh
Next, enter these two commands to activate mise in your shell:
echo 'eval "$(/home/$USER/.local/bin/mise activate bash)"' >> ~/.bashrc
source ~/.bashrc
Verify that it works by running mise -V. We will now install the languages, exactly the same way as it was done on macOS.
mise use --global node@lts
mise use --global python@3.13
mise use --global java@corretto-25
As done with mise, enter these two commands in the terminal to install uv for Python development.
curl -LsSf https://astral.sh/uv/install.sh | sh
source ~/.bashrc
Setting Up Git In WSL
Configure the credentials for Git. Add your username and email; thus, replace the placeholder my_user with your actual username and email.
git config --global user.name "my_user"
git config --global user.email "my_user@gmail.com"
We will use an SSH key to get GitHub to work with your local repository. Generate an ED25519 SSH key with the following command:
ssh-keygen -t ed25519 -C "my_user@gmail.com"
Run this command to copy it to the Windows clipboard:
cat ~/.ssh/id_ed25519.pub | clip.exe
Go to the SSH Keys page on GitHub. Click on New SSH Key, paste it, and add the key.
Verify with ssh -T git@github.com, which should give you the following message below:
Hi {my_user}! You've successfully authenticated, but GitHub does not provide shell access.
WinGet
Just like there’s homebrew for macOS, there’s one for Windows. The difference is that you will use it to install applications on Windows, while languages and other essential packages reside in the WSL Ubuntu instance. Essentially, it is akin to using --cask with brew.
In PowerShell, enter these two winget commands to download Visual Studio Code and Docker Desktop:
winget install -e --id Microsoft.VisualStudioCode
winget install -e --id Docker.DockerDesktop
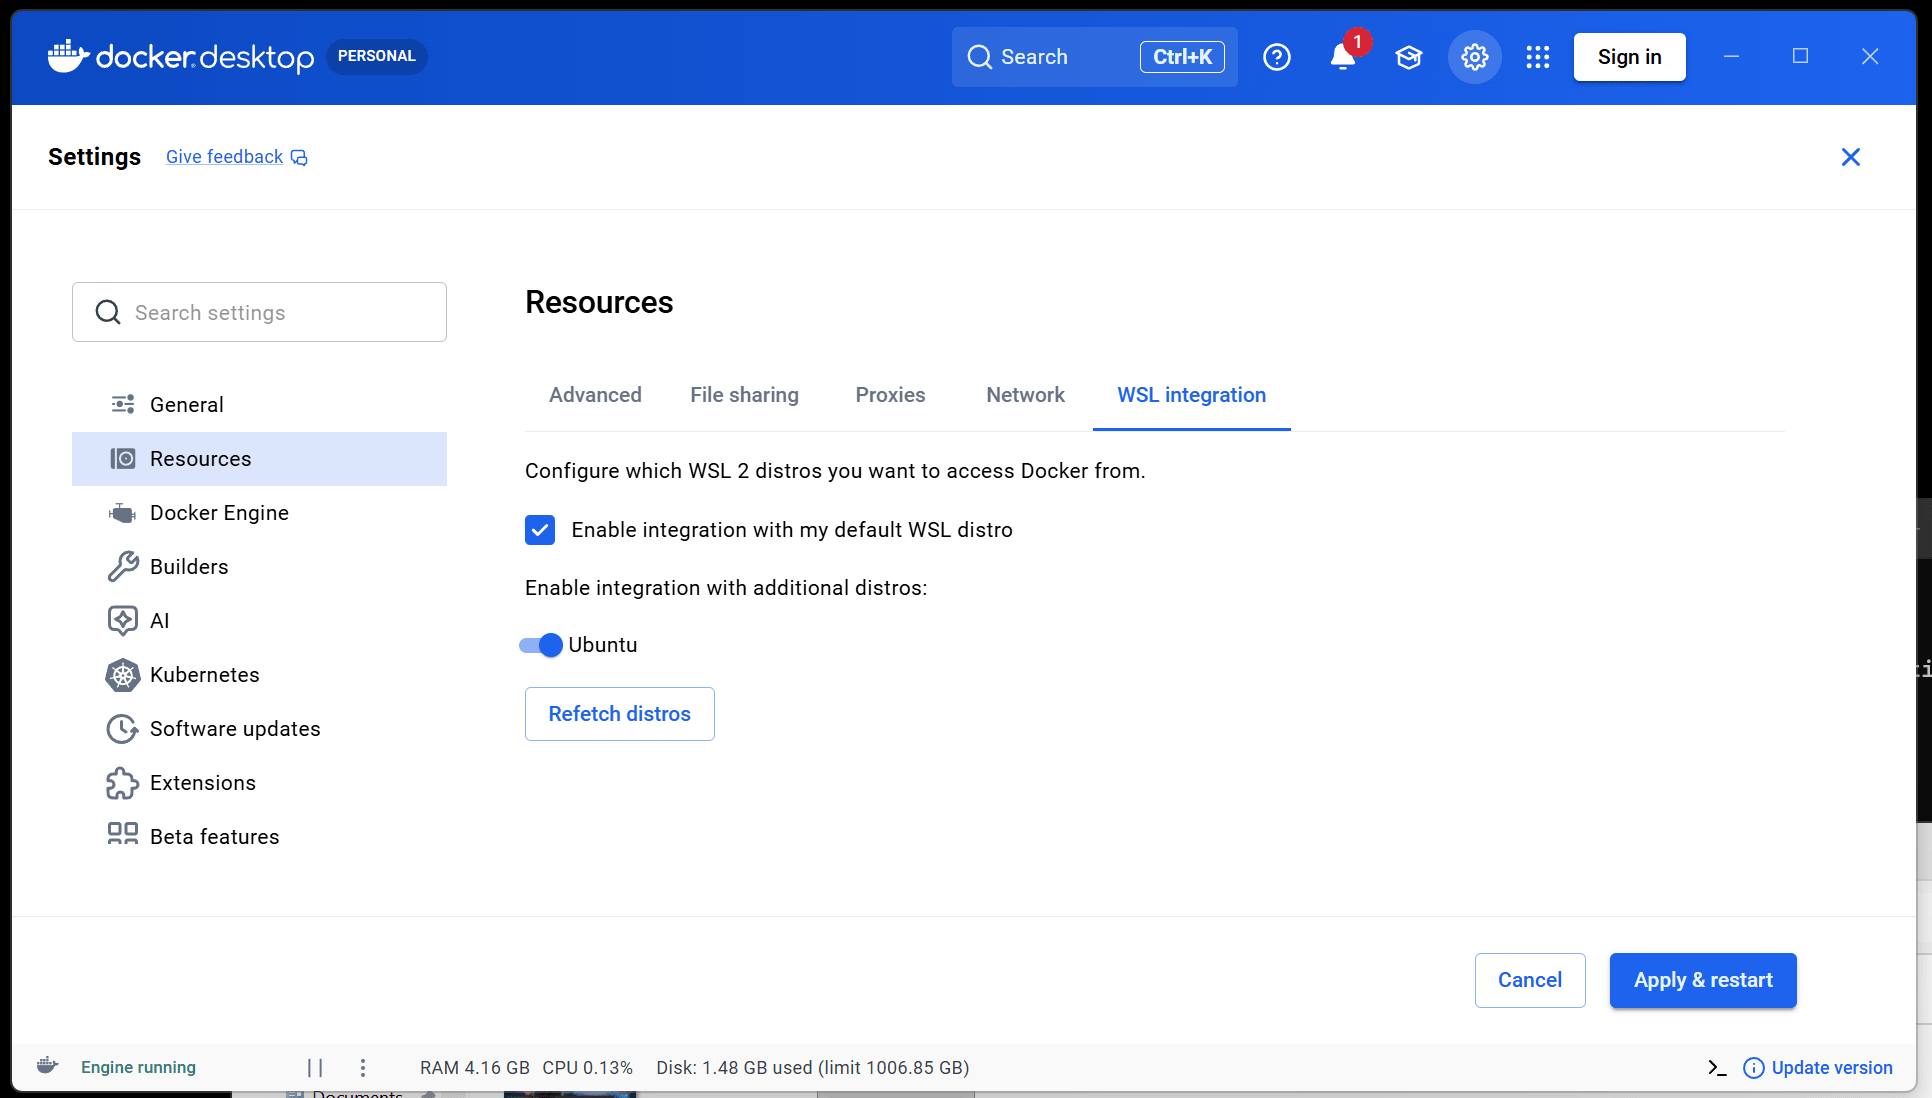
An additional step will need to be taken with Docker Desktop, so open up the desktop application (there should be a shortcut on your desktop; otherwise, search for it in the Windows Start menu), and click on the gear icon at the top.
Next, click on Resources on the sidebar, and navigate to WSL integration.
Check Enable integration with my default WSL distro and toggle the switch for Ubuntu as pictured below.
Click Apply & Restart.
VS Code WSL Extension
Finally, we will get to the basic workflow process. First things first, we will need to restart Ubuntu, so switch over to the PowerShell tab and enter:
wsl --shutdown
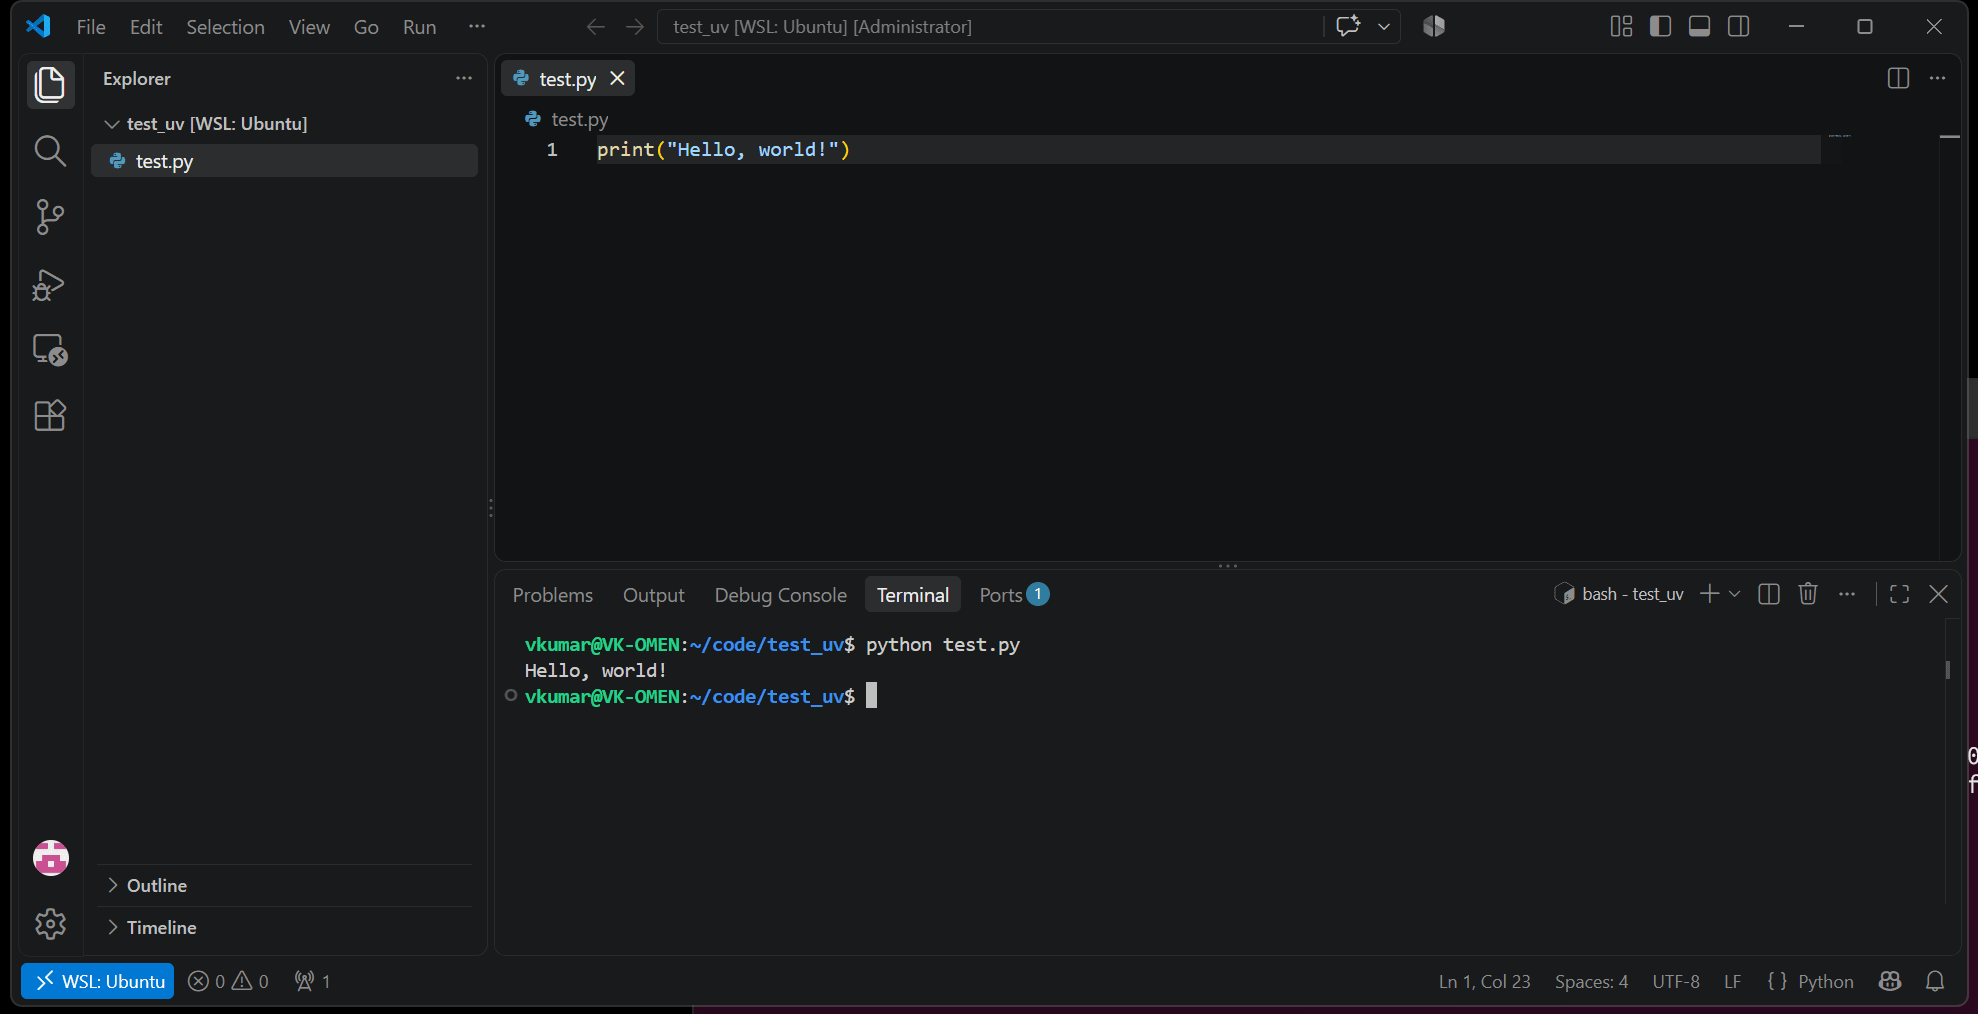
Re-open the Ubuntu terminal, and verify that running which code gives the path to VS Code on Windows.
Now you will be able to run code . when you are in the project directory, and automatically open up VS Code.
But before we do that, open up VS Code on your Windows machine so we can download an extension to add WSL support. Click on the Extensions icon (or Ctrl + Shift + X), type “WSL”, and it should be the very first extension you see, officially from Microsoft.
Once that has been downloaded, switch back to your Ubuntu terminal, navigate to your project directory, and run code .
The first time you run it, it will take a few seconds to install VS Code Server for Linux x64.
The picture below is the result you should see on your machine if the steps have been followed correctly to this point.